A Gentle Introduction to the Terminal
Who Should Read This Book?
This ebook is intended for new and aspiring software developers who want an introduction to the terminal, and the command line. It is possible experienced developers could learn something from this book, and I certainly won't tell you not to read this book. But you may not find it as useful if you understand the command line, navigating file systems with the command line, and other concepts like shells and command line applications and interfaces.
My goal with this book is to make working with the terminal and command line easy to understand. I use examples, analogies, and a lot of plain English to introduce the concepts of the terminal. I include some tangents that may not be necessary for the topic at hand, but that I consider "good to know" or worth noting in the greater domain of software development.
By the end of this book, you should be able to:
- run commands in the terminal and complete basic, common file system and data manipulation tasks
- write shell scripts so you can simplify and automate the above point
- pretty up your terminal to look pleasing and functional so you enjoy opening the terminal
- open up a programming book and focus on the fun part - the programming!
The book focuses on using a Linux-like terminal. What that means is:
- Linux users can just read the book and follow along without concern
- Mac users shouldn't have any issues following along with the built in terminal, but some commands may work differently on Mac than Linux
- Windows users can install WSL and Windows Terminal to follow along much the same as a Linux user would - in fact, this is how my home computers are set up :)
Before we move on to the meat of the book, I have a request. If you have any questions or comments about the contents or structure of the book as you're reading, please let me know either on Twitter or through email at [stephen.hara@stephenhara.com]. I want to make this book the best it can be, and I can only do that with feedback from real readers!
With that out of the way, let's continue!
What is the Terminal?
When developers talk about the "terminal", there are several different terms they may use: command line, or console, or terminal, or shell. Historically, all these terms have distinct meanings and separate origins. But the beautiful thing about language is it evolves!
Today, the two main concepts to keep in mind are the terminal and the shell.
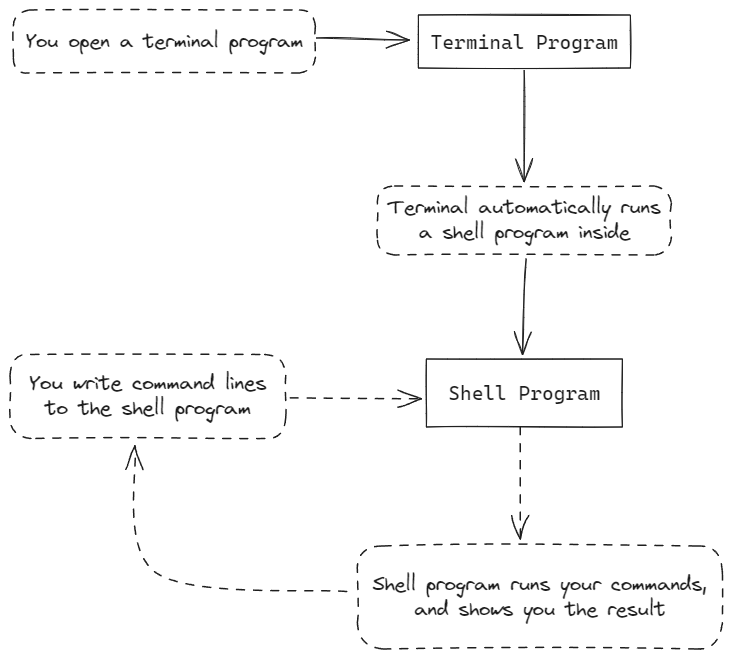
The terminal is a program that lets you type commands to your computer and see the results. You could think of it as an advanced window into a computer's data. For Windows, the default terminal program is the Windows Terminal (as of 2023). On Mac OS, the default is Terminal. And on Linux, the default...well, it depends on the distribution of Linux you're using.
By itself, the terminal doesn't do much. The primary form of interacting with computer's data is with a program that runs "inside" the terminal, most often a shell program. When you open a terminal program, it will open a shell and wait for you to start giving commands. You can then type commands and submit them with the "Enter" or "Return" key. A submitted command is also called a command line. The shell will then try to execute your command line, display the results, and then wait for more commands.
How to Read the Examples
As this is an introduction to the terminal, there will be some examples of terminal commands used in this book. A common convention used in other texts looks like this:
$ echo "Hello"
Hello
When you see a block of text that looks like this, it should be read as code. Most of the code in this book will be in the language of the shell, and any exceptions will be noted.
The first line starts with a dollar sign, followed by the command. The dollar
sign here is also called the prompt. When you see such a line, you can run the
same command by typing in everything on the line after the dollar sign. In
this case, echo "Hello". In some cases, such as Windows command lines, the
default symbol is a right angle bracket instead:
> echo "Hello"
Hello
The second line is the output of the command, which usually includes the results of the command, and extra information that may be useful or helpful. That could be more context about the command's operation, or information about anything that went wrong and resulted in an error. We also say that output is printed to the screen, or console, or terminal - or to files!
Inline Code References
There may also be times, such as two paragraphs before this one, where something
is formatted a little different from the other text: it will look like this.
This formatting should also be read as a reference to something in code, but
being used in the middle of...well, some non-code text, like this paragraph!
A code block may also include some lines that have a # at the beginning or in
the middle:
$ ps # show the current processes on the system
  PID TTY          TIME CMD
   98 pts/0    00:00:00 bash
  192 pts/0    00:00:00 ps
A #, also known as the pound sign, the hash mark, or (my favorite) the
octothorpe, means that anything that comes after it on the same line is a
comment. Comments are ignored when your computer executes your code, so you
can use them to explain a section of code, document a piece of code, or
otherwise communicate to other developers.
Shell Scripts
Some code blocks will have a specific line at the top that looks a bit like a comment:
#!/usr/bin/env bash
some_command
What this exactly does is explained later, but for now, you can interpret this as meaning the code block is a standalone shell script, or a file of shell commands.
For now, you should just keep one thing in mind about shell scripts: they will only have commands and comments written inside of them, and there won't be any output shown in these code blocks.
Choices to Consider
This section is optional, and many developers have perfectly satisfying and successful careers without exploring the choices here. But it can be fun, and I think it's worth a quick mention.
As previously mentioned, we have two main programs when we work in the terminal: the terminal itself, and the shell program running in the terminal. In 2024, the options available for both of those programs are vast and numerous, with a whole assortment of trade-offs to evaluate and ponder!
Before computers, documents were stored as paper copies and organized into folders, then boxes, then filing cabinets, and those filing cabinets were stored in office rooms, taking up a lot of space and often not adding much to the aesthetic value of a room.
Today, a lot of documents are digital, and the computers they're stored on take up far less space than filing cabinets, and the aesthetic possibilities are mindbogglingly close to infinite! Just ask anyone who's deep in the world of mechanical keyboards!
With all these files in our computers, we still maintain a pretty similar structure to the old ways of document storage. Files are stored in folders, which are in other folders, and theoretically this folders-in-folders point could go on for a very long time. Well, that's all well and good, but what's it got to do with the command line and terminals and REPLs?
When you give the shell program in your terminal a command, it uses its current location in the file system as a reference point. You could think of each folder or directory in the file system as a room. Inside of each room is:
- a door to go one level up
- the files inside of each room, with a name and other information like date of creation
- any doors that go one level deeper into the file system
The shell can see all of this, and the most common commands you'll use involve navigating the file system and getting information about the objects inside of it.
Let's look at a few.
The Room I Start In
When you open a terminal, on most modern Linux systems you'll get something like this:
[stephen@virtualbox ~]$ []
Where it has information about the user (stephen), the computer
(virtualbox), and also the current directory. The squiggly ~ or tilde is a
convention that simply refers to your user's home directory.
From the way I wrote that, you may think "Well hold on, what's a home directory? And does every user have one?" And these are great, natural questions!
To answer the second question first: yes! Every user on a typical Linux machine has their own home directory, that other non-administrator users can't access. It's quite similar to any other multi-user accounts, like how you might have multiple users on a streaming service account, or how you can't see the email inboxes of your coworkers.
For the first question, a home directory is just somewhere in the file system you can put files (and whatever that entails, like projects, videos, and so on) that is a space for you. Like your home, or your room at your parents' house.
Simple Navigation
Now, let's see what's inside this room. We use the command ls to do this:
[stephen@virtualbox ~]$ ls
Desktop  Documents  Downloads  Music  Pictures  Public  Templates  Videos
[stephen@virtualbox ~]$
On this machine, all I have in my home directory is a bunch of empty folders. Seeing as I just set this virtual machine up, that's not a surprise.
Now, suppose you want to see what downloads you have on the computer. You can
use the command cd, short for "change directory", followed by the folder name:
[stephen@virtualbox ~]$ cd Downloads/
[stephen@virtualbox Downloads]$ ls
[stephen@virtualbox Downloads]$
You may notice, the "~" has turned into the word "Downloads". Nifty!
We can also see that, as the result of the ls command this time was nothing,
there aren't any files or folders in here. An empty room.
Command Options
How can we get back? Before we do that, let's try a modified ls command. Use
ls -a instead:
[stephen@virtualbox Downloads]$ ls -a
.  ..
With the addition of the "-a", we gave the ls command an option,
specifically an option that we want to show all the files, even the hidden ones.
"Dash-little-a" for "all" - simple!
This time it showed us two very strange "files": a dot, and two dots.
Similar to the tilde being shorthand for "user's home directory", these two file names are conventional. The single dot refers to "this current directory", while the two-dot file refers to "the directory one level up".
So what happens if we try to cd .?
[stephen@virtualbox Downloads]$ cd .
[stephen@virtualbox Downloads]$
Evidently, nothing! This isn't terribly useful with the two commands we know now, but it can be very handy with other commands.
Before we try to change to the directory one level up, let's introduce a new
command, pwd, or "print working directory":
[stephen@virtualbox Downloads]$ pwd
/home/stephen/Downloads
This tells us all the directories up we can go from the current directory, which
is related to where we go with cd ..:
[stephen@virtualbox Downloads]$ cd ..
[stephen@virtualbox ~]$ pwd
/home/stephen
As you can see, we went up one directory from the Downloadsdirectory, and that
brought us back to ~. But recall that ~ is shorthand, and the full path to
get to ~ is actually /home/stephen.
Path is another common term, and it just means, in the rooms analogy, the path of rooms you would navigate to get to a location. In the usual terminology, it's the directories you navigate to get to a file or folder. You may also hear "file path".
Relative and Absolute Paths
When we first used the cd command, we used it to move into the Downloads
folder. When we did, we supplied a relative path - in that case, Downloads.
It's a relative path because relative to the starting location, it looked for
the directory named Downloads, found it, and moved into that location. If we
were in another directory that also had a Downloads folder, the same command
would work, we would just be in a different folder than the one we ended up in.
By contrast, when we used the pwd command from inside the Downloads folder,
we saw more than just the folder name - we saw /home/stephen/Downloads. That
is the absolute path of the Downloads folder, so-called because an absolute
path can never be mistaken for any other path. If you were to
cd /home/stephen/Downloads, you will always go to the same location no matter
where you start from.
Let's look at how relative paths may lead to confusion:
[stephen@virtualbox Examples]$ ls
Downloads
[stephen@virtualbox Examples]$ pwd
/home/stephen/Examples
[stephen@virtualbox Examples]$ cd Downloads/ # Usage 1
[stephen@virtualbox Downloads]$ pwd
/home/stephen/Examples/Downloads
[stephen@virtualbox Downloads]$ cd ~
[stephen@virtualbox ~]$ cd Downloads/ # Usage 2
[stephen@virtualbox Downloads]$ pwd
/home/stephen/Downloads
Notice how the lines marked Usage 1 and Usage 2 are the same command:
cd Downloads/, and yet pwd gave different results afterwards.
Now let's see how we could navigate to the same folders with absolute paths:
[stephen@virtualbox Public]$ pwd
/home/stephen/Public
[stephen@virtualbox Public]$ cd /home/stephen/Examples/Downloads/
[stephen@virtualbox Downloads]$ pwd
/home/stephen/Examples/Downloads
[stephen@virtualbox Downloads]$ cd ~/Downloads/ # you can use ~ in place of typing out your home directory in commands!
[stephen@virtualbox Downloads]$ pwd
/home/stephen/Downloads
Fancy!
More Commands
So far, we've learned only 3 commands:
lsfor listing the contents of the directory we're incdfor moving between directoriespwdto see what directory we're in, as an absolute path
This is a great baseline for navigating the file system, but we don't yet have any commands for manipulating the file system - creating files, deleting files, renaming files, and doing the same with directories. Now that we have a basic understanding of the file system, we can introduce these without too much additional explanation.
Creating Files with touch
With the command touch followed by a file name, you can create an empty file
with the given name:
[stephen@virtualbox Examples]$ touch my_file.txt
[stephen@virtualbox Examples]$ ls
Downloads  my_file.txt
[stephen@virtualbox Examples]$ touch my_file.txt
[stephen@virtualbox Examples]$ ls
Downloads  my_file.txt
Notice that trying to touch the same file name twice didn't result in 2 files.
In fact, touch does something different with existing files. Let's take a look
at what it does by using a different option for ls, this time the -l option
for the "long listing" format.
[stephen@virtualbox Examples]$ ls -l
total 4
drwxr-xr-x 2 stephen stephen 4096  6月  5 16:16 Downloads
-rw-r--r-- 1 stephen stephen    0  6月  5 16:58 my_file.txt
#                                            ^-- look here!
[stephen@virtualbox Examples]$ touch my_file.txt
[stephen@virtualbox Examples]$ ls -l
total 4
drwxr-xr-x 2 stephen stephen 4096  6月  5 16:16 Downloads
-rw-r--r-- 1 stephen stephen    0  6月  5 16:59 my_file.txt
#                                            ^-- look here!
The ls -l form gives some extra information beyond just the name of each file.
We won't dive too deep into this for now, but if you'd like to know what they
are, in order:
-is the file type. This first character is shorthand, with the most common characters being-for a regular file,dfor directory, orlfor a link - we won't discuss links too much in this book, though.rw-r--r--is the permissions of the file, whererstands for read,wstands for write, andxstands for execute. There are three separate permission groupings: owner, group, and "all" for everyone else. They're divided into 3 groupings of 3, with dashes representing permissions the grouping has: in this example, the owner has read and write permissions, while the group and everyone else only has read permission1is the number of links to the filestephenandstephenare the owner and group of the file. These are the same on this personal system, but they won't always be!0is the size of the file. Since it's empty, it has a size of 0. Directories will always have a fixed size of 4096, or 4 kilobytes6月 5 16:59is the time the file was last modified - this is a Japanese output format in my case, since my machine is located in Japan- And lastly,
my_file.txtis the name of the file
The result of touch in the above example was the modification time being
updated to the time of the command, which is what touch does to files that
already exist. If they don't exist, then it instead creates an empty file with
the given name.
Deleting Files with rm
To delete a file, use the rm command (short for "remove") followed by the file
name:
[stephen@virtualbox Examples]$ ls
Downloads  my_file.txt
[stephen@virtualbox Examples]$ rm my_file.txt
[stephen@virtualbox Examples]$ ls
Downloads
Farewell, my_file.txt! The only other note I have on this is you should
never run this command:
rm -rf /
This command deletes every file on the file system and it is a very, very bad idea. Don't do it!
To understand how it works:
- the
-roption is short for "recursive", meaning the command will delete everything under the given directory - the
-foption is short for "force", meaning the command will not ask for any confirmations to delete protected files and such, it will simply destroy them - the folder name given to it,
/, means the top of the file system. There's nothing above this, so it's also called the root of the file system
Now, while this specific command is extremely dangerous, the two options can be very useful both by themselves, and when combined but with a different folder name. Clearing out data from a big directory is one example. Just double check what the folder name is before you hit "Enter"!
Creating Directories with mkdir
Creating directories is done with the mkdir command:
[stephen@virtualbox Examples]$ ls
Downloads
[stephen@virtualbox Examples]$ mkdir MyDirectory
[stephen@virtualbox Examples]$ ls
Downloads  MyDirectory
Simple! We can also use the -p option to create multiple subdirectories at
once, since the standard behavior only expects one new "level" of directory:
[stephen@virtualbox Examples]$ mkdir MyDirectory/AnotherDir/AndAnother
mkdir: cannot create directory ‘MyDirectory/AnotherDir/AndAnother’: No such file or directory
[stephen@virtualbox Examples]$ mkdir -p MyDirectory/AnotherDir/AndAnother
[stephen@virtualbox Examples]$ cd MyDirectory/AnotherDir/AndAnother/
[stephen@virtualbox AndAnother]$ ls
[stephen@virtualbox AndAnother]$ pwd
/home/stephen/Examples/MyDirectory/AnotherDir/AndAnother
Deleting Directories with rmdir
To delete empty directories, we can use rmdir, short for "remove directory":
[stephen@virtualbox Examples]$ mkdir SomeDirectory
[stephen@virtualbox Examples]$ ls
Downloads  SomeDirectory
[stephen@virtualbox Examples]$ rmdir SomeDirectory/
[stephen@virtualbox Examples]$ ls
Downloads
As an inverse to mkdir -p, we can do rmdir -p for multiple levels of empty
subdirectories:
[stephen@virtualbox Examples]$ mkdir -p MyDirectory/AnotherDir/AndAnother
[stephen@virtualbox Examples]$ rmdir -p MyDirectory/AnotherDir/AndAnother
[stephen@virtualbox Examples]$ ls
Downloads
Renaming Files and Directories with mv
Renaming files and directories is done with the same command, mv, short for
"move". It needs the target file or directory, as well as the new name for the
target, like so:
[stephen@virtualbox Examples]$ mkdir -p MyDirectory/AnotherDir
[stephen@virtualbox Examples]$ ls
Downloads  MyDirectory
[stephen@virtualbox Examples]$ mv MyDirectory/ OrIsItYourDirectory
[stephen@virtualbox Examples]$ ls
Downloads  OrIsItYourDirectory
[stephen@virtualbox Examples]$ touch my_file.txt
[stephen@virtualbox Examples]$ mv my_file.txt or_is_it_your_file.txt
[stephen@virtualbox Examples]$ ls
Downloads  OrIsItYourDirectory  or_is_it_your_file.txt
You can also use mv to move files into directories:
[stephen@virtualbox Examples]$ mkdir Stuff
[stephen@virtualbox Examples]$ touch my_file.txt
[stephen@virtualbox Examples]$ ls
my_file.txt  Stuff
[stephen@virtualbox Examples]$ mv my_file.txt Stuff/
[stephen@virtualbox Examples]$ ls
Stuff
[stephen@virtualbox Examples]$ cd Stuff/
[stephen@virtualbox Stuff]$ ls
my_file.txt
Summary
In this chapter, we looked at the basics of the file system on Linux, how this relates to the terminal, and how we can basically navigate around the file system with the terminal.
In the next chapter, we'll be taking a closer look at files and programs and how, ultimately, they are not so different!
Typically when you open a terminal for the first time on a new computer, you're greeted with something like this Windows command prompt:

Or something like this on Ubuntu:

A few things have happened implicitly that ultimately lead to what you see here.
Shell Programs
A terminal doesn't do much by itself - it's really just a "screen" that you can primarily interact with via text commands. What shows up inside the terminal window is a program that opens with the terminal by default.
In most cases, this is a shell program. Similar to zoological shells that surround an organism but are not part of the organism, a shell program is separate from the operating system, but intimately connects with the operating system. Not similar to zoological shells, you can send commands to a shell program that let you manipulate and gather information about your computer.
Throughout this book I'll sometimes suggest commands for you to run. That will look like this nicely formatted snippet below:
echo "Hello there!"
You can either copy and paste this into your terminal window, or type it out yourself. Some may say the pain and effort of typing it out yourself is better for learning, and it's certainly good practice for when you have to figure out the correct command for your own situation. But it's up to you how you want to see the commands in practice!
Let's try running the above command.
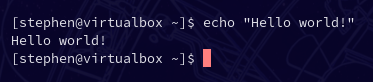
It executed the command we gave it, and then it brought us back to the starting point!
The REPL
When you run a command in the shell, the shell program goes through a little routine:
- Read the command given by you, the user;
- Evaluate the command, or run the command and send the result back to the shell;
- Print the result of the command to the shell interface; and
- Finally - sort of - the shell prepares to do it all over again, waiting for a command so it can go back to step 1 again
And then it does this until the shell program closes. Usually this is when you
close the window, or run the command exit.
Since this routine happens over and over as you run commands, we say that it's running in a loop, like how a loop of string or thread makes a path you can follow continuously. Because of that, we call this read-evaluate-print loop a REPL for short.
The term has some cool historical context you can touch on from Wikipedia, but that isn't required reading.
Programming in a REPL
The REPL is a convenient construction for software development. Many programming
languages provide a REPL program for running bits of code for immediate results,
which may help you with testing or experimentation. The Python language REPL can
be accessed with the command python like below:

And from here you can write some small snippets of Python, or even a full program if you want!
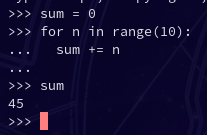
This simple program adds up all the numbers from 1 to 10.
Of course, you wouldn't want to type entire programs into the REPL every time you need to run one. You can also run code by putting that code into a file. In fact, some languages don't provide a default REPL, and you have to put the code into a file so another program called a compiler can make that code into something that the computer can understand.
Compiled Languages VS Interpreted Languages
This ebook isn't intended to be a full discussion on the types of languages a software developer may encounter, but this brief tangent on the subject will be helpful in your development career!
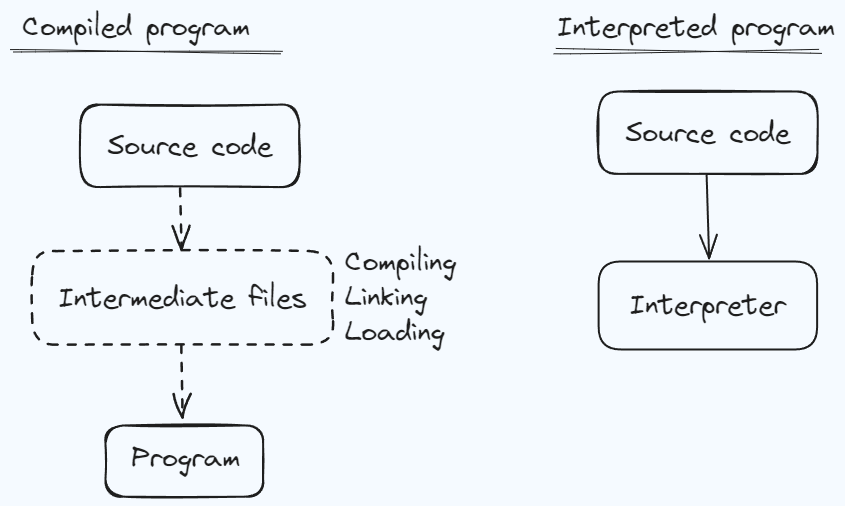
This diagram is a massive oversimplification, but as an introduction to the concept, it will work well enough.
Generally speaking, compiled languages and interpreted programs differ in the relationship between the source code and the "program" that does things in the computer. A compiled program is not the source code that programmers write. Rather, it is a product of the source code being processed by a different program or set of programs. Often, this set of programs is simply referred to as the compiler for that language, since the process is called compiling. In actuality, the compiler is one of several programs, processing the results of previous programs in a chain, and eventually this creates the program that you can run (or execute, or invoke, or kick off...we have a lot of words for this idea) to do things on your computer.
With an interpreted language, by comparison, the source code more or less is the "program". Instead of being compiled, however, the source code is interpreted, line by line, by a program called the interpreter. The Python REPL in the example from before is such an interpreter, and it can operate line-by-line as a REPL does, or it can operate on files of source code.
In practice, the two concepts can get quite blurry. It's possible to partially compile interpreted languages in order to make them run faster, and it's possible to build an interpreter for a language that's usually compiled! You shouldn't have to worry about such things for a while, though, as those details are typically under the hood if they happen at all.
As a final note, interpreted languages are often synonymous with another term, scripting languages. As you may expect, programs written in scripting/interpreted languages are frequently called scripts. "Run the deployment script" is something I've heard and said quite a bit in my career!
Summary
5 Programs and Variables
In this chapter, we'll look at programs, their true nature, and how your computer knows about the programs we've used so far and all the others you can use. As part of this, we'll also start looking at the concept of variables, which are a key programming concept, and a very basic but practical way to use them.
Programs are Files
Well, that's quite a header! But indeed, it's true - programs, fundamentally,
are also files. On Windows, they typically have the file extension .exe, but
on Linux it's common for programs you run from the terminal to not have any
extension.
Of course, not all files are programs - or at least, not valid programs. The details are a world all their own, but we won't get into it too much here.
The important consequence of this fun detail is that programs aren't some special entity embedded in your computer. Since they're files, they exist somewhere on the file system. You can move them, rename them, download them, share them, and do anything you would do with any other file.
As an extra note, on Linux, everything is represented as a file. Your USB devices like mouse and keyboard, your screens, your internet connection, any other connections...they're all files! The consequences of that are better suited for a book on Linux, but it's noted here just for information's sake.
Finding A Program's Location with which
Well, if our programs are somewhere on the file system, how do we find where
they are? We can use the which command, with the program name as its argument:
[stephen@virtualbox Examples]$ which ls
/usr/bin/ls
This says that on my system, the ls program is in the /usr/bin directory.
And indeed, if you run ls /usr/bin, it's full of programs! There are 2,802
files in that directory on my machine, to give you an idea.
In case you're curious, it's common convention in Linux world to use bin as a
directory name for programs, either on a system or as part of a larger software
project. "Bin" is short for "binary", which is a file format that humans
generally can't read, but the computer can read. In a different context, it's
also a number system of 1s and 0s!
The binary file format is smaller in computer size than text files, so that's a major advantage for storing programs and other files that don't need to be read by humans. When we discuss programs as software developers, they may also be referred to as "binaries", particularly in the context of single-files. The commands we've looked at so far could all be considered "binaries"!
Types of Data
Before moving further, this is a good opportunity to look at a foundational programming concept: all the data in your computer has a certain shape, and that shape is called it's type.
Imagine you're at a party and the host is preparing an order for pizza. If you have 12 attendees, they'll probably make some basic calculation like "we should get 1 pizza for every 3 people", leading to an order of 4 pizzas. All the numbers involved here are one common data type, integers, or numbers without a fraction or decimal point. In most programming, they in fact can not have a fractional part.
Now imagine you instead have 13 attendees at the same party. The same calculation will lead to a result of 4 and 1/3 pizzas. That is a real number, more commonly known in programming as a float, short for "floating-point number", or a double, short for "double-precision floating point number". Those terms have a more mathy origin that I won't get into here too much. Ultimately, it's hard to order a third of a pizza, though, so you probably round up to 5 pizzas or round down to 4 pizzas.
Now as the host is ordering, he has to direct the pizza delivery to his address. He'll say something like "42 Wallaby Way", which will turn into a string in the order system, so-called because it's a string of characters. A character, ultimately, is just a letter, number, symbol, empty space, or put another way, for simplified practical purposes, the smallest thing you can highlight when you move a mouse over text with the left-click held down.
With the terminal, these are the most important data types. Almost everything is inherently interpreted by the shell program as a string, then if you need to do math you can with specific programs. But there are many more types of data in programming, and you'll learn about them in due time!
Environment Variables with env
One question you may have involves that directory, /usr/bin. Is that a magical
directory that I need to put all my programs if I want to use them? The answer,
thankfully, is no! That would get pretty gnarly pretty fast.
To understand how the terminal finds programs, we need to look at another
command, env:
[stephen@virtualbox ~]$ env
SHELL=/bin/bash
PWD=/home/stephen
HOME=/home/stephen
USER=stephen
PATH=/usr/local/bin:/usr/bin:/bin:/usr/local/sbin:/usr/bin/site_perl:/usr/bin/vendor_perl:/usr/bin/core_perl
The actual output of this command was very long, so I've trimmed the unimportant stuff for now. This output is all of the environment variables in my current shell.
A variable in programming is, very broadly and imprecisely, a value - it could be a number, a string of data, or something more complex in fancier programming languages. In most shell programs, variables are limited to numbers and strings.
The environment is the context the program is running in. This involves details like what operating system am I on? How do I know with what format to print out times and dates? How do I know what currency or language I should show to the user?
Often, the answers to those questions are stored in the environment variables.
Conveniently, the env command shows all of the current shell's environment
variables!
In my trimmed example output, I left 5 variables of interest:
SHELLis the shell program, given as an absolute path- You might notice this program lives in
/bin, whereaslslived in/usr/bin./binhas a more direct relationship with the operating system, while/usr/binis a bit more flexible. You still shouldn't change things in/usr/binthough :)
- You might notice this program lives in
PWDis the working directory, which we can also see with thepwdcommand from earlierHOMEis the user's home directory. This is equivalent to the~as we saw earlierUSERis the current logged in user. That's me!- But it's also possible to take on the perspective of other users if you have their password, or root access on the machine
The last one, PATH is the important one for this lesson. The value of PATH
is always a list of directories, separated by a colon : so multiple
directories can exist in the same variable. When you type a command in the
shell, it searches each directory in the order shown for the command you gave.
When it finds a match, it runs the program and stops looking. If it doesn't find
a match, you'll get a message like this:
[stephen@virtualbox ~]$ some_command
bash: some_command: command not found
Adding Directories to PATH
One way to "add" a program to your shell is by moving it to a folder in PATH.
While this works, there's another way that's more flexible and doesn't clutter
your system folders. PATH is an environment variable, and in programming, we
have a lot of control over variables! Most of the time, anyway...
Some Linux distributions, like Ubuntu, include ~/.local/bin as a PATH
directory. My example doesn't, but we can add it a few different ways. For now,
we'll just temporarily modify the environment variable, using the export
command:
export PATH=$HOME/.local/bin:$PATH
Wow! What's going on here? Let's go left to right.
The export command in general makes variables carry over into any programs you
run from the same shell session. When you open a new terminal window, that
makes a new shell session - when you close a terminal window, that closes that
specific shell session.
Next is the name of the variable we want to carry over, PATH. This could be
any variable name, and we could even make a new variable if we wanted:
export MY_FAVORITE_FOOD=pizza
You may notice all of the environment variables so far have been all uppercase names. This is another convention, mostly to make it easy to distinguish variables from commands.
Variable Expansion
After the name is an equals sign followed by the value we want to set for this
variable. In this value, we include the values of two variables, marked by the
dollar sign $. In order to see what value PATH ends up with afterwards, we
can use the echo command:
[stephen@virtualbox ~]$ echo $PATH
/home/stephen/.local/bin:/usr/local/bin:/usr/bin:/bin:/usr/local/sbin:/usr/bin/site_perl:/usr/bin/vendor_perl:/usr/bin/core_perl
That looks quite a bit different than our export command! How did that happen?
When we send commands to the shell, the shell automatically takes the variable names we used in the command and replaces them with their value. This process is called variable expansion, because it "expands" the variable into its value.
So when we give this command to the shell:
export PATH=$HOME/.local/bin:$PATH
It takes the two variables, HOME and PATH, and replaces them with their
values. In my case, HOME is /home/stephen, and PATH is...well, I'm lazy,
so I'll just say it's the default environment path.
Cleaner Variable Expansion
You might think it's a little confusing. How does the shell know where a
variable ends and non-variable stuff starts? Better yet, how could you know if
the variable names aren't quite as comprehensible as HOME or PATH?
A best practice for using variables in the shell is to surround them with curly
brackets {}. This makes it clear what part is a variable and what part is not,
and makes it easier to read. To use this in our previous example, we can do:
export PATH=${HOME}/.local/bin:${PATH}
When you write your variables like this, it's much easier to read it as a human! This has the added benefit of letting you easily expand variables that you intend to put in front of another string:
[stephen@virtualbox ~]$ echo $HOMEdirectory

[stephen@virtualbox ~]$ echo ${HOME}directory
/home/stephendirectory
In the first attempt, the shell tried to find the variable HOMEdir, which
isn't defined. So it just gives us a blank line instead of adding "directory" to
the end. By using curly brackets, the shell knows it's actually looking for the
variable HOME, and then it should write "directory" right after the end of
that variable's value.
Summary
Shell Scripting
In the last chapter, we looked at how you can customize your terminal experience
with the .bashrc configuration file and some alternative shell and terminal
programs. While the .bashrc file is a conventional place to put personal
configuration, at its core, it's just a slightly special case of a shell script.
Or, in other words, a program!
We call it "scripting" because you're writing a sequence of instructions for the shell program to follow, like a theater or movie script. Don't be too concerned with the fact it has a different (and more specific) name than "programming", however - it's still programming!
In this chapter, we'll mostly look at some best practices that will help you write clean, readable, and understandable programs. While I will use shell scripting, specifically bash, for the examples (this is a book on the terminal, after all!), you can assume they are generally good starting points for structuring larger programs in any language.
Reusable Code with Functions
You may recognize the word "function" from math education, where it more or less meant "an equation with some number of variables that you plug in to find the answer". You may remember the formula for a line: $$y = mx + b$$ Which you were likely taught is also written as: $$f(x) = mx + b$$ Where the $f(x)$ indicates a function that varies with respect to x. In other words, the result or output of the function (annotated as $y$ or $f(x)$) depends on the input (annotated as $x$).
To get a bit into the weeds here, mathematical functions like this are often called pure functions, because they always provide the same result if you provide the same input. There's an entire paradigm of programming that relies on this handy consistency called functional programming. But that's a topic for another book!
In programming, our functions often look like this in concept, but are written quite differently. One major commonality is the idea of function inputs and outputs, where the inputs may also be called arguments or parameters, and the outputs are also called return values.
Here's a few examples from several different languages:
// C++
int y(int x) {
  const int slope = 2;
  const int y_intercept = 5;
  return x * slope + y_intercept;
}
// Javascript
function y(x) {
  const slope = 2;
  const y_intercept = 5;
  return x * slope + y_intercept;
}
# Python
def y(x):
  slope = 2;
  y_intercept = 5;
  return x * slope + y_intercept;
# Elixir
def y(x) do
  slope = 2
  y_intercept = 5
  x * slope + y_intercept
end
# F#
let y x: int =
    let slope = 2
    let y_intercept = 5
    x * slope + y_intercept
# bash
function y {
  slope=2
  y_intercept=5
  echo "$1*$slope+$y_intercept" | bc
}
These functions all do the same thing, but different languages have different ways to specify or define a function.
When possible, make individual functions simple to understand what they're doing, even if how they do it is complicated. Here are some ways to help with understandable functions.
Names
Give them good names for the context they exist in. In my examples, y isn't
a very good function name in general, but since we were just looking at a
function annotated as $y$, it's not too bad here. A better general name for the
function might be something like linear_equation.
Short and Sweet
Psychology generally agrees that humans can only store between 4 to 7 pieces of information in working memory, so that's about the upper limit of how much "stuff" a function should do at once.
It's easy to interpret that as "4 to 7 lines of code", but I don't think that's very helpful, because not all lines are created equal. Instead, I think you can use it as a guideline of how many things a function is doing.
In the above example with the linear equation function, all of the example functions have 3 lines of inner code. But only 1 line is really important to knowing what the function does - the last one, where it calculates the result.
Maybe instead of just one linear equation, we want a function that calculates 2 linear equations and subtracts them from each other. Something like:
function distance_between_lines {
  slope_a=2
  slope_b=7
  y_intercept_a=5
  y_intercept_b=0
  echo "$1*$slope_a+$y_intercept_a - $1*$slope_b+$y_intercept_b" | bc
}
We added two lines, but it's still not doing too much more conceptually.
Now maybe we want to calculate this for a range of values for x and then show
that to the user:
function distances_between_lines_for_range {
  slope_a=2
  slope_b=7
  y_intercept_a=5
  y_intercept_b=0
  for i in {1..10}; do
	  answer=$(echo "$i*$slope_a+$y_intercept_a - $i*$slope_b+$y_intercept_b" | bc)
	  echo "$i: $answer"
  done
}

# running this function gives us...

bsh ❯ distances_between_lines_for_range
1: 0
2: -5
3: -10
4: -15
5: -20
6: -25
7: -30
8: -35
9: -40
10: -45
The main work of this function takes place in only 2 of the 9 lines inside of it, but those 2 lines could count as 2 separate main actions: calculate the difference, and printing the result of that calculation.
Use Other Functions
In functions you write, you can use other functions! In bash, this looks like our 6th function line:
answer=$(echo "$i*$slope_a+$y_intercept_a - $i*$slope_b+$y_intercept_b" | bc)
(Technically, this is a command, but in bash, using or calling a command looks like using or calling a function.)
Basically, you can wrap any function or command in $(...) and assign it to a
variable to use the result of that function/command elsewhere in your script.
In other languages, it's not quite as clunky as it is in bash. Here's a Python example:
def linear_equation_a(x):
  slope = 2
  y_intercept = 5
  return x * slope + y_intercept

def linear_equation_b(x):
  slope = 7
  y_intercept = 0
  return x * slope + y_intercept

# Calculate the difference between the two linear equations at `x`.
def linear_equation_difference(x):
  return linear_equation_a(x) - linear_equation_b(x)
Document Them!
Using comments is a great way to explain a function in plain human language. We
could document the purpose of the distances_between_lines_for_range function
like this:
# Calculate the distance between two lines for the range 1 through 10
# and print the result for each input value.
function distances_between_lines_for_range {
  ...
}
Bash and some languages only allows single-line comments with #, but some
languages allow multi-line comments for somewhat cleaner documentation comments.
Here's an example of a Java documentation comment in the Javadoc style:
/**
	* Returns an Image object that can then be painted on the screen.
	* The url argument must specify an absolute <a href="#{@link}">{@link URL}</a>. The name
	* argument is a specifier that is relative to the url argument.
	* <p>
	* This method always returns immediately, whether or not the
	* image exists. When this applet attempts to draw the image on
	* the screen, the data will be loaded. The graphics primitives
	* that draw the image will incrementally paint on the screen.
	*
	* @param  url  an absolute URL giving the base location of the image
	* @param  name the location of the image, relative to the url argument
	* @return      the image at the specified URL
	* @see         Image
*/
public Image getImage(URL url, String name) {
	try {
		return getImage(new URL(url, name));
	} catch (MalformedURLException e) {
		return null;
	}
}
Notice that this documentation comment has a few different components. There's
the short description of the function, then a more detailed description that
indicates the expected format of the parameters and some notes about its
behavior. It also includes, as annotations like @param and @return, the name
and description of its inputs and outputs.
Structure of a Bash Function
Here's an example of a small function I wrote in my .bashrc:
function source__ {
  SOURCE_FILE=${1:-~/.bashrc}
  source "$SOURCE_FILE"
}
The first line has three important parts:
functiontells the shell "I want to define a function",source__is the name of the function, and- the
{curly brace is how we mark the beginning of the function
The second line only does one thing: if we provided an argument when we called
this function, use that for the variable SOURCE_FILE; if we did not, default
to using my .bashrc in my home directory. The syntax for this is a bit clunky,
unfortunately.
The third line also only does one thing: run the command source with the
SOURCE_FILE variable as its argument. The source command simply runs the
argument as a shell script. In the case of my .bashrc, this defines functions
like this and modifies or sets any environment variables I want to change.
The fourth line is just a } right curly brace, telling the shell that the
definition is complete.
When the shell runs these four lines, it doesn't run them yet. It simply stores the commands inside the curly braces, also called the function body, and gives me the ability to run something like this:
source__ my_config_file.sh
To execute the function body, replacing argument 1 $1 with
my_config_file.sh.
As an aside, you can also define a function like this:
source__() {
  # the inside is the same as before
}
Bash treats this first line exactly the same as function source__.
Splitting Code Across Files
Did you know that Google has more than 2 billion lines of code? That's a lot of typing!
Fortunately for their employees, not all 2 billion lines are in the same file.
Projects big and small can benefit from logical separation of code into multiple
files, and with shell scripting it's quite easy! In fact, you can use my
source__ function from the last section, or just use the built in source
command. Here's some of the first few lines of my configuration file:
source ~/.gitbash

# Work specific bash stuff
if [ -f ~/.workbash ]; then
  source ~/.workbash
fi
Basically, I always have a separate file for setup and commands related to the
git program that I call .gitbash. When I've been working somewhere for a
bit, I'll probably have some setup that's only important for work, so I always
put that in a file called .workbash. The if block says "if the file called
.workbash exists, then source it". If I didn't have that, I would get an error
like this:
bsh ❯ source .workbash
-bash: .workbash: No such file or directory
Running the if block like I have it instead gives no error:
bsh ❯ if [ -f "~/.workbash" ]; then
∙ source .workbash
∙ fi

bsh ❯
Nice!
The mechanism for making code available across different files is
Summary
More Useful Utilities
So far, we have a small but powerful list of commands:
cd,ls,mv,touch,rm,mkdir,rmdir, andpwdfor information and basic manipulation of the file systemwhichfor finding the location of programsenvandexportfor environment variables and setting new variablesechofor printing values to the screen, such as variables after expansion
In this chapter, we'll look at a variety of other commands that you'll likely encounter as you use the terminal more in your development journey.
Command Manuals with man
Since I want this book to stay a reasonable length, I only briefly introduce the commands here. But, as the saying goes, "if you teach a developer one pattern for a command they can use that one pattern, but if you teach a developer to check the manual, they can use all the patterns". Maybe I just made that up, actually.
For many system commands, you can use the man command (short for "manual") to
pull up a fancy interactive manual:
[stephen@virtualbox ~] man man
MAN(1)                                                                                       Manual pager utils                                                                                       MAN(1)

NAME
       man - an interface to the system reference manuals

SYNOPSIS
       man [man options] [[section] page ...] ...
       man -k [apropos options] regexp ...
       man -K [man options] [section] term ...
       man -f [whatis options] page ...
       man -l [man options] file ...
       man -w|-W [man options] page ...

DESCRIPTION
       man is the system's manual pager.  Each page argument given to man is normally the name of a program, utility or function.  The manual page associated with each of these arguments is then found and
       displayed.  A section, if provided, will direct man to look only in that section of the manual.  The default action is to search in all of the available sections following a pre-defined order  (see
       DEFAULTS), and to show only the first page found, even if page exists in several sections.
The manual pages are built in to most Linux systems for all the common commands and many more uncommon commands too. They contain command descriptions, usage examples, documentation of options, and pretty much all the information you might need for most uses of each command.
Navigating the manual pages with the up and down arrow keys is possible, but
slow. Instead, man allows you to use the same key bindings as less, a useful
program used for viewing files and long outputs. To summarize:
dmoves "down" one-half page, whilebmoves "back" one half-pageumoves "up", but by one full page instead of half-page/allows you to search for specific text. For example, if I wanted to know what the-ioption formandoes, I can type:/-iand press Enter, it will highlight the matches and jump the view to the first match- As an example:

- As an example:
- If you have searched for text with
/, you can usento jump to the next match andNto jump to the previous match qwill quit the programgby itself will move to the top of the file, or if you provide a number and then typeg, you'll move to the line number providedGby itself moves to the bottom of the file, or with a number does the same asg
Alternative Naming with alias
Sometimes, you may want to give a command you use frequently a "shortcut"
command to save time. You can use the alias command to do so:
~
bsh ❯ alias me='echo "Hello there, $(whoami)!"'

~
bsh ❯ me
Hello there, stephen!
Nifty!
To set these every time you open your shell, you can just put alias commands
in your .bashrc file. Although you shouldn't overuse aliases, a light
sprinkling of them can be very helpful and productive!
If you want to see all the aliases you have defined, you can run alias by
itself:
~
bsh ❯ alias
alias g.b='git branch -v --sort=committerdate'
alias g.c='git commit -v'
alias g.co='git checkout'
alias g.cv='git commit --no-verify -v'
alias g.d='git diff'
alias g.log='git log --graph --format=format:'\''%C(bold blue)%h%C(reset) - %C(bold green)(%ar)%C(reset) %C(white)%s%C(reset) %C(bold white)— %an%C(reset)%C(bold yellow)%d%C(reset)'\'' --abbrev-commit --date=relative'
alias g.p='git pull -r'
alias g.pf='git push --force-with-lease'
alias g.s='git status'
alias g.tree='git log --graph --pretty=oneline --abbrev-commit'
alias ls='eza -G'
alias src='source__'
alias vim='nvim'
Maybe I should clean these up sometime...
Search for Files with find
The find command allows you to search for specific file names in specific
directories. The general usage looks like:
find <directory> -name <file_name>

find . -name cat_names.csv
find /bin -name ls
find is extremely flexible and has a variety of modes of operation. You can
search for directories instead:
# find all directories in the current directory
find . -type d
You can use what's called a glob to search for files by their file extension:
find . -name '*.csv'
And you can filter by size, owner, modification date, and more.
Search Through Files with grep
Sometimes you want to find lines matching a pattern in a specific file or files.
For this, you can use the grep command, which has a funny name originating
from a common command in an older tool.
grep <pattern> <files>
[stephen@virtualbox ~] grep export .bashrc
    *) export PATH="${PATH}:${new_path_entry}" ;;
  export LLVM_INSTALL_PATH="/home/stephen/local/llvm16-release"
  export FLYCTL_INSTALL="/home/stephen/.fly"
export FZF_DEFAULT_COMMAND='rg --files'
This example searches my system configuration file called .bashrc for any
lines that contain the text export. Although there's some mystery in the
format, you can see that I use export in 4 different places in this file.
Let's try another example:
[stephen@virtualbox ~] grep PATH .bashrc
    case ":$PATH:" in
    *) export PATH="${PATH}:${new_path_entry}" ;;
  export LLVM_INSTALL_PATH="/home/stephen/local/llvm16-release"
  path_add "$LLVM_INSTALL_PATH/bin"
  path_add "$FLYCTL_INSTALL/bin"
Notice that although I searched for "PATH", it also printed out lines that have
"PATH" as part of another "word", like "LLVM_INSTALL_PATH". You can make it only
look for "whole" words with the -w option:
[stephen@virtualbox ~] grep PATH .bashrc -w
    case ":$PATH:" in
    *) export PATH="${PATH}:${new_path_entry}" ;;
You can also print out the line numbers of each matching line with -n:
[stephen@virtualbox ~] grep PATH .bashrc -n
43:    case ":$PATH:" in
45:    *) export PATH="${PATH}:${new_path_entry}" ;;
51:  export LLVM_INSTALL_PATH="/home/stephen/local/llvm16-release"
63:  path_add "$LLVM_INSTALL_PATH/bin"
64:  path_add "$FLYCTL_INSTALL/bin"
And you can make the pattern match on any combination of uppercase and lowercase
with -i:
[stephen@virtualbox ~] grep PATH .bashrc -i
path_add() {
  new_path_entry="$1"
  if [ -n "$new_path_entry" ]; then
    case ":$PATH:" in
    *:"${new_path_entry}":*) ;;
    *) export PATH="${PATH}:${new_path_entry}" ;;
modify_paths() {
  export LLVM_INSTALL_PATH="/home/stephen/local/llvm16-release"
  zig_paths
  path_add "/usr/local/sbin"
  # more of the above...
modify_paths
There are quite a few other options you can find in the man page!
The Pipe Operator |
Sometimes, you'll want to use the results of one command to feed into another command. Perhaps you want to get all the text files in your directory and order them by the file name. How would you do this? Well, we can use the pipe operator! So named because, well, it looks like a vertical pipe, and it sends data between commands. We could use it like this:
find . -name "*.txt" | sort
The sort command, as you may expect, sorts the strings it receives
alphabetically and numerically, like a dictionary does.
However, if we have text files in a subdirectory, this doesn't quite work:
bsh ❯ find . -type f
./sample/file5.txt
./file1.txt
./file6.txt
./file2.txt
./file4.txt
./file3.csv

bsh ❯ find . -name "*.txt" | sort
./file1.txt
./file2.txt
./file4.txt
./file6.txt
./sample/file5.txt
We would expect "file5" to be before "file6", but because of the subdirectory,
"file6" shows up first. To fix this, we can use a command basename:
bsh ❯ basename sample/file5.txt
file5.txt
What happens if we put this before sort in the pipe?
bsh ❯ find . -name "*.txt" | basename | sort
basename: missing operand
Try 'basename --help' for more information.
Well, that's not what we want. We can't use it directly, but we can use another
tool called xargs to build a command from the results of the previous command:
bsh ❯ find . -name "*.txt" | xargs basename -a
file5.txt
file1.txt
file6.txt
file2.txt
file4.txt
The -a option tells basename to take multiple arguments and operate on them
individually. And now, it works! They're out of order, but we can just slap a
sort at the end:
bsh ❯ find . -name "*.txt" | xargs basename -a | sort
file1.txt
file2.txt
file4.txt
file5.txt
file6.txt
And now we know all the text files in and below our current directory, and they're sorted!
Simple Text-editing with nano
The most common thing you'll do in a typical software development career is
typing text. For that, you'll need a text editor, and I think nano is the
simplest one to start with. To start it, run:
nano <file_name>
As an example, I ran this to open one of my terminal configuration files:
nano .bashrc
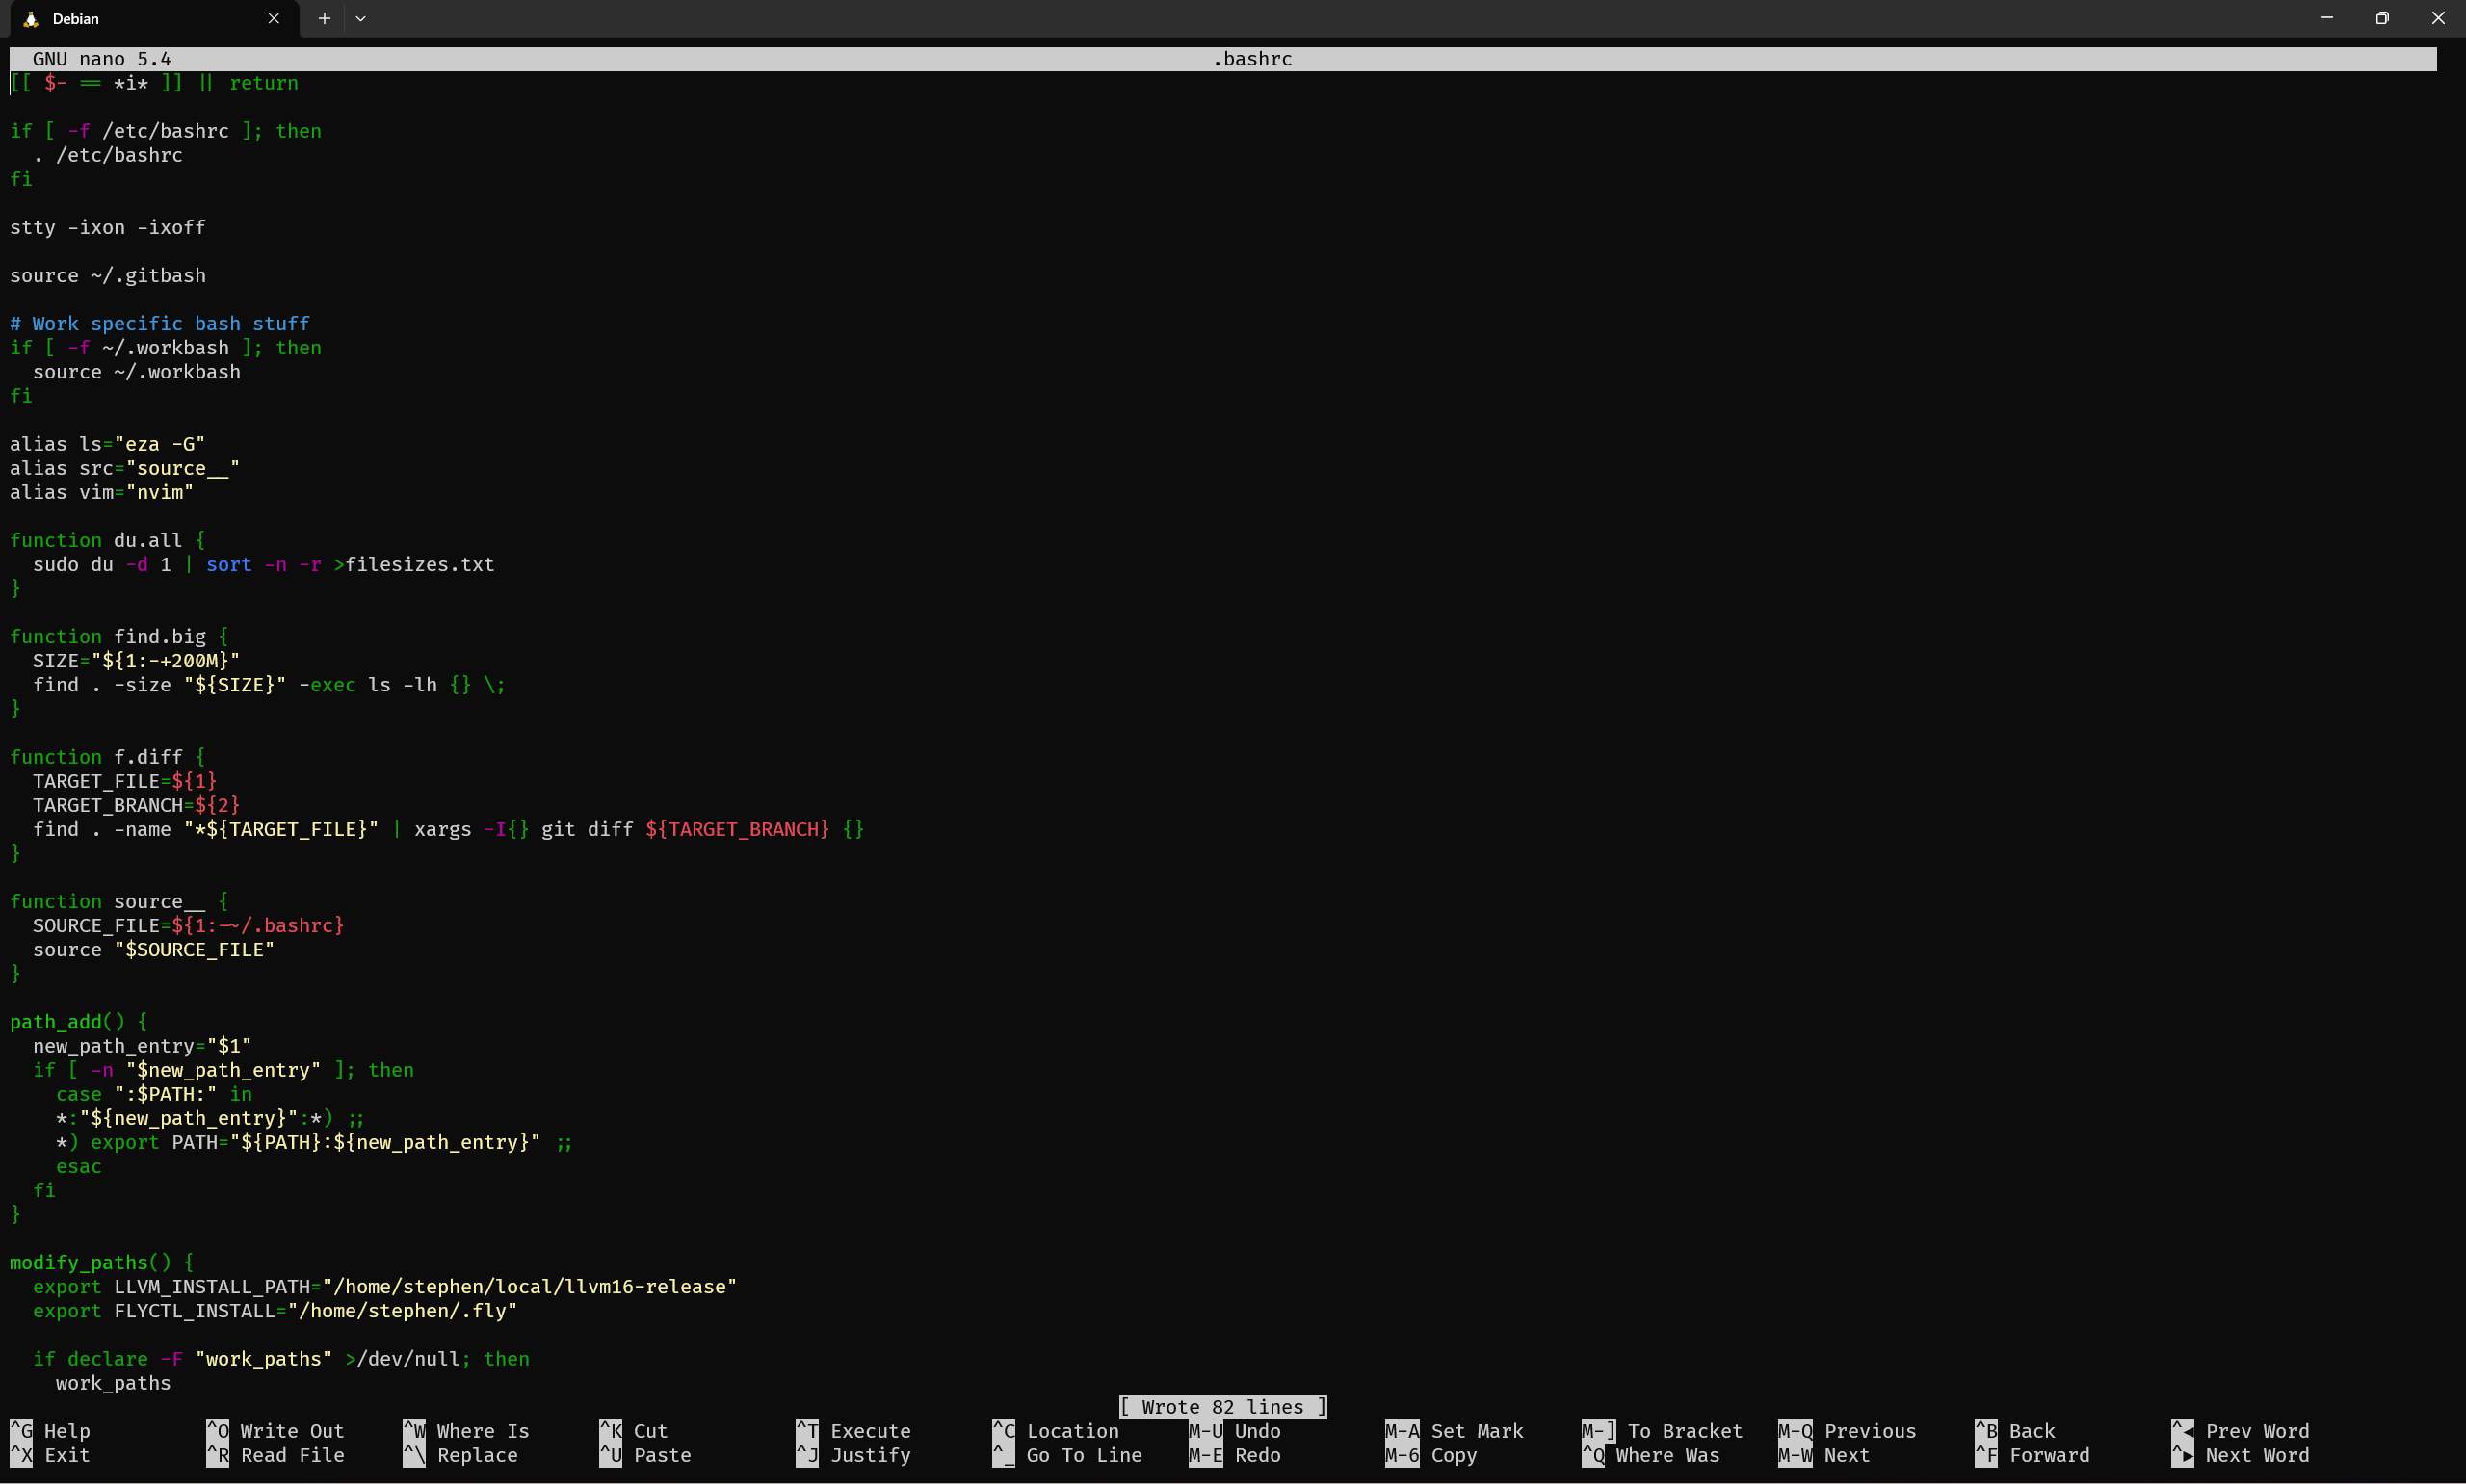
What I like about nano is the always-present control scheme guide at the
bottom of the screen. The commands starting with ^ indicate the Ctrl key,
starting with M indicates Alt, and although it's not a power tool, it colors
text in the file based on the file type, and enables basic editing.
Outside of the special commands at the bottom of the screen, nano works
exactly like Notepad or Google Docs, just without formatting. Typing adds
characters to the file, while Backspace and Delete remove characters from the
file. Shift accompanied by movement with the arrow keys or the back/forward/next
word/previous word commands selects an area of text that you can cut, copy, and
paste.
It's pretty simple, but effective.
Complex Text-editing with emacs or vim
This section could easily be multiple encyclopedias' worth of introduction, so
this is just a brief note on the world of text editors. In the terminal world of
editors, emacs and vi are the two historical options. vi itself isn't used
much today, but it inspired vim, which later spawned my personal choice of
editor, Neovim.
You might not know that the two editors have a very contentious history in what's called the editor war. Software developers have held very strong opinions for a long time.
Whether you choose to use a terminal editor or a GUI editor, just remember that
whatever you enjoy using is the best tool for you! Some developers vibe better
with vim or emacs, some will prefer something like Visual Studio Code, and
some will enjoy a more full-feature solution like JetBrains or Visual Studio
(distinct from Visual Studio Code).
Lists for Further Reading
If you want to see a different list of a lot of terminal commands, there's a great list from DigitalOcean on the top 50+ commands! That's a lot!
Now that we have a better handle on terminal commands and environment variables, we can start looking at one of the funner bits of the terminal: customizing it!
This will mostly be an overview of the ways you can customize the terminal and some options I know of in each category. I encourage you to explore a bit, as a terminal that's fun to look at and use is a great way to encourage using it more!
The shell
Most Linux distributions use the bash shell program by default, though not
all - zsh is another choice you may have. You can find out which one your
system uses from the SHELL environment variable:
bsh ❯ echo $SHELL
/bin/bash
Some of what I describe in this section may be bash-specific, so if your shell
is zsh or something else, you may need to do some searching if something I
have here doesn't work and I haven't noted the alternative.
In general, bash is the safest shell to assume that another developer will be using, and most shell scripts you find on the internet are bash-compatible. That said, there's a small but enthusiastic community for many alternative shells, such as: dash, fish, nushell, Powershell for Windows, elvish...
The .bashrc file
For bash, customization mainly happens in a specific file that bash loads when
it starts, located at ~/.bashrc by default. This file lets you execute
commands when you start your shell, and that includes things like setting up
environment variables, defining functions, and other preferences.
We'll talk about some of those features more in-depth in the next chapter and focus this chapter on how to add individualized touches.
The prompt
Similar to how questions on a survey or creative writing scenarios implicitly request your input, the shell also requests your input - both in the form of a prompt.
The shell prompt is the stuff that shows automatically every time you have input control in the terminal. All of the below prompts have shown up in this book so far:
# this prompt says the user, the machine name, and the directory
[stephen@virtualbox ~]

# this prompt says the directory on its own line, then a line break,
# then says which shell I'm using, followed by a prompt separator
~
bsh ❯

# this prompt says my directory (on Windows) followed by a prompt separator
C:\Users\sthar>
In bash, this prompt is decided by the variable PS1, short for "prompt string
1". You can build the first prompt here with this string:
export PS1="[\u@\h \W]\$ "
This uses some prompt string shorthands (/\u, /\h, and /\W) to show the
user, the "host name" of the machine, and the working directory.
For a long time, I had a custom prompt I made myself, with lots of colors and
meta-information, and a mysterious WAIT_WHAT_STRING I can't remember the
purpose of. You can build your own and do something like I did, assigning the
final string to the environment variable PS1:
build_prompt() {
	# find out if we're running a virtualenv
    if [ -z ${VIRTUAL_ENV+x} ]; then # VIRTUAL_ENV is unset
        if [ $(pwd) == ~ ]; then
            echo "No virtual environment set here"
        fi
        VIRTUAL_ENV_PROMPT_STR=""
    else
        VIRTUAL_ENV_PROMPT_STR=" ($(basename `echo ${VIRTUAL_ENV}`))"
        echo "Currently in ${VIRTUAL_ENV_PROMPT_STR:2:${#VIRTUAL_ENV_PROMPT_STR}-3}"
    fi

    # now build the string
    DATETIME_STRING="\[$(tput setaf 6)\]\d \[$(tput setaf 4)\]"
    VENV_STRING="\[$(tput setaf 3)\]${VIRTUAL_ENV_PROMPT_STR}"
    CURRENT_DIR_STRING="\[$(tput setaf 1)\]\w"
    USER_STRING="\[$(tput setaf 2)\]\u"
    WAIT_WHAT_STRING="\[$(tput sgr0)\]"
    GIT_STRING="\[$(tput setaf 7)\]$(__git_ps1)"

    PS1="${DATETIME_STRING}\t ${VENV_STRING} ${CURRENT_DIR_STRING} ${GIT_STRING}\n    ${USER_STRING} >${WAIT_WHAT_STRING}"
}
But that's pretty gnarly. Nowadays, I just use Starship for something easy and pretty. You can find a list of some other ready-to-go prompts in this "awesome bash" repository.
The terminal emulator
The last piece for this chapter, and for some developers the most important, is the terminal emulator itself. There are a few dimensions worth considering here:
- appearance
- speed
- customizability
I personally just use Windows Terminal on my home machines and Alacritty if I have to work on MacOS. There are loads of other options, though, such as this list of terminal emulators on another Github repository.
Summary
What a ride! In just a few chapters, we've gone through so many concepts. You now have a foundational understanding of:
- the terminal, shell, and the other terms used for them
- REPLs and one programming language distinction, compiled vs interpreted
- the Linux file system
- variables!
- a whole assortment of terminal programs you can use as building blocks
- how to customize and personalize your terminal experience
- writing more general shell scripts
While you're still a ways to go from being a terminal master, you should have enough knowledge to pick up a book on programming and focus on the programming part, without getting too bogged down in the often-underexplained bits about installing and commands and whatnot.
What's Next?
Before sending you on your journey, I'd like to offer my perspective on a common question: what programming language should someone try first?
The answer to that question, like so many others in this wonderful, frustrating life, is: it depends! That's not very useful though, so to expand: it depends on what you'd like to do with programming.
If you'd like to dive deeper into Linux, operating systems, and how they work, I would recommend looking into: C, Zig, or Rust. These languages are considered systems languages because they're well suited for writing, well, systems! They'll have a steep learning curve, but a lot of concepts in that learning curve will make you one hell of a programmer.
If you'd like to work on machine learning and AI, I would suggest either Python or, for the more adventurous, Elixir. You should also learn some statistics, as AI and machine learning are, in essence, gigantic statistical models.
If you'd like to work on mobile applications, you should look at Kotlin for Android, or Swift for iOS. There are technologies that allow you to develop for both simultaneously, such as Flutter and React Native, but in practice they are not perfect at bridging the gap.
If you'd like to work on web applications to build SaaS products and other web experiences, you may prefer more "complete" development toolboxes such as Ruby on Rails, Elixir Phoenix, or Laravel (PHP). There are also many Javascript frameworks such as React, Vue, and Angular that have been used in countless web applications today.
Lastly, if you're like me and you're starting to learn programming so you can make games, the good news is you have many more reasonable options than I had when I started! If you want to do everything from scratch, it's hard to name a better language than C or C++, but only because of the ecosystem for game development.
If you'd rather have a complete toolbox with a graphical editor and a wealth of other fantastic resources, look into game engines like Unity (uses C#), Unreal Engine (uses C++), or Godot (uses a custom Python-like language called Gdscript, but can also use C# without much setup). All of those engines are free to get started with, which is another advantage for aspiring game developers today!
Final Plugs
If you haven't already, I'd appreciate if you signed up for my mailing list, where I'll post updates about other things I'm writing, announce upcoming books and courses, and recommend learning resources for all kinds of aspiring developers!
If you have questions, comments, or suggestions about the book, please feel free to message me on Twitter or email me at [stephen.hara@stephenhara.com]!